Thursday, April 4, 2013

SakuraCon 2013 Debut of Cloud Strife and Zack Fair cosplays~!

Hello all!

I'm very excited to share with you photos of my convention debut of my cosplay of Cloud Strife, and the cosplay of Zack Fair, worn by Justin! These characters are from the Final Fantasy 7 world.  We had a blast wearing them and interacting with everyone, and can't wait to go back next year.

Before I show you the photos, I want to express my thanks to everyone who helped me with these costumes in the few weeks before the convention.  I had worked on them for a good six months or more on my own, but suddenly it was March and a lot of the big pieces were not finished, so the few weekends before the con were spent in a mad rush.  So a big "THANK YOU" to my amazing husband who helped with both sets of pauldrons, and pretty much kept me from falling apart; to my dad for lending us the tools needed; to my brother and his wife for help with Zack Fair's pauldrons; to Justin and Bob for making the swords (!! they turned out so epic-- look for construction details for entire cosplay later on!); to Dana for allowing us to use her woodshop; and to Amryn for helping wrap the sword hilts! I couldn't have done it without everyone!

Okay, now for photos! Captions added when I deem it necessary :)  Also a big shout-out to Justin for actually being strong enough to wield his Buster Sword and having multiple poses for photos! I have like 2 or 3 poses max, so feel free to laugh at my expense :)

My belt twisted to the side here, effectively killing off some really good photos otherwise >.<
So intense!
We're so enthused!
Ohhh yeah, flex them biceps! 
By all means, mess with the two cosplayers with twenty-five pound swords. 
Re-enacting the passing of the Buster Sword, with 300% less blood and tears!


Alrighty, time for the photos taken with other cosplayers!

With Sephiroth *dun dun duuuuuun*
With a lovely Jenova, Kadaj, and another Sephiroth.
Re-enacting a scene from Final Fantasy 7: Advent Children with double the Aeriths! and minus the Advent Children Cloud haha.

Okay, so even Cloud can smile around Fluttershy!

Cute Yuffie!

Cloud versus Squall

Another Sephiroth! 
With lovely Lightning.

Justin, don't look so calm standing next to the Tonberry!

Zack and Cloud versus Shizuo of Durarara!!

Um, camera is over here Zack! A cute Tifa and Vincent.
A cute gal from Bleach (forgive me I can't place her character name!)


 Ahhhh, looking back at the photos makes me want to go back! Despite the bruises I'm still sporting from being beat up from my own sword and armor, this was such a fun cosplay and I already have more photo-shoots planned with it.  I couldn't have asked for a better response to my cosplay at the convention, either! People loved our cosplays and that couldn't make me happier! To have our hard work be so well received is the best compliment a cosplay can ask for.  And another big thanks to Justin for being an awesome cosplay partner!

I think this is it for this post, everyone.  I definitely have more photos, of my Gatomon cosplay and of our overall experience at the convention, so please look forward to those! Feel free to leave comments, or you can email me at heartandsoulcosplay@gmail.com.


Wednesday, February 20, 2013

Gatomon's Tail

Hello everyone!

So what I will be describing today is the process I went through to create an attachable tail for my Gatomon gijinka.

The very first step, as with most projects, was research.  I spent a good couple hours on the good ol' Internet, looking at different methods people used to create and attach tails, but nothing was really speaking to me as far as what I wanted my tail to do.  Some attachments seemed very flimsy, while others were sturdy, but just looked plain uncomfortable.  And not to generalize things, but a lot of times when I would search "cosplay tails," the results were for total fursuits, which was also not my goal.  So ultimately, I consulted my husband and we came up an attachment that is secure, yet somewhat subtle.

Materials:
-Copper wire of a medium gauge from electrical section of Home Depot (they have it on big spools and they can cut it by the foot for whatever length you need.  AWESOME! and not super spendy, either!)
-White felt (for wrapping exposed end of wire)
-Fleece (this is for the body of the tail of course, and I used two colors to achieve my desired tail)
-Stuffing

Step 1:  Creating the Tail Skeleton
    This is a step I had my husband help me with because I am not strong enough to bend the wire on my own.  First, we measured how long the tail was to be (also easier with a second person!) We folded the wire so that it was two-ply throughout the length of the tail, starting in the middle so the "closed" end would be the end of the tail and the "open" ends would be shaped into the attachment.
     For the attachment, the wire was shaped into a vague "W" shape, with a bend in-between the two arms of the W and then the middle is a bit recessed.
   I was a bad blogger and didn't take a photo of the skeleton before I put finished it, but here are some photos of the attachment so you can get a better idea:


So the "outsides" of the "W" go inside my pants, while the uncovered copper middle of the "W" stays on the outside of my pants.  I added the felt for extra grip, and so I didn't have copper touching my skin for an extended period of time and causing a rash.

Step 2:  The Body of the Tail.
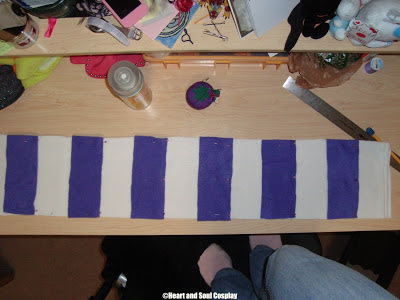
     First, I determined how big around I wanted the tail to be, and cut the fabric width accordingly, allowing a bit extra for when I sewed it together.  Then, I determined how big I wanted the spaces between stripes to be.  Just for clarification, the white portion is all one piece, then the purple stripes are hand-sewed into place.


I then sewed it into a tube.  For the end of the tail, with the "three-pronged tuft" for lack of a better description, I patterned out what I wanted it to look like, then cut out the fabric and sewed it together, leaving the part to attach to the end of the tail open. I added stuffing to the tuft at this point, then made jagged edges, and hand sewed it on, like shown below:


Overall, I'm happy with how the tuft turned out.  Looking straight on, it seems a little wonky, and looks sort of like a hand.  But from most angles, it looks like an anime-style tail tuft.  

Step 3:  Finishing the Tail.
    After the tube was sewn and the tuft attached, I then inserted the copper skeleton.  Then, using a wooden dowel with a paper towel wad taped to the end, I stuffed the length of the tail.  This was an arduous process, because it took a lot of effort to not overstuff the tail while maintaining an even amount of stuffing throughout the length of the tail.  Once I was satisfied, I then sewed the felt on the the attachment and a little bit down the length of the tail, and then sewed the length of the tail shut, as can be seen in the first images.

I've tested the tail on my outfits, and I'm pretty impressed with how well it turned out.  The attachment is secure, which I tested by running, bouncing, and skipping around.  The attachment also sits nice where my shirt meets my pants. The tail, when straight, barely brushes the floor, but I curved it a bit for more personality.  It sways back and forth when I walk, which is cute, I guess?  But the important thing is is that it stays in place!

A photo of me wearing it will come after I wear the entire costume at Sakura-Con 2013! So keep coming back to my blog, yes?

I hope this was a helpful blog post! Again, I welcome any questions, comments, or concerns.
Until next time!
-Alycia


Wednesday, February 13, 2013

Gatomon's Gloves

Hi everyone! I'm happy to report I have one cosplay totally finished for the upcoming Sakura-Con 2013.  This particular one is my Gatomon gijinka, or humanoid version.  Gatomon is that cute little cat Digimon you might remember specifically from the first two seasons of Digimon!

Before I post any photos of the outfit in it's entirety, I wanted to post mini-guides and tutorials on how I made each part of the costume (that means you'll keep coming back, right?).  The first part of the costume I made was her gloves.

I'm also going to have to ask you to politely overlook the old watermark stating "Everyday Otaku", as I was a dumb blogger and deleted the original photos.  But that will only be in the first half of the photos.  The latter half will have the shiny new watermark!

Here we go!

Step 1:  Made a pattern resembling the shape of the glove (cat paw).


Looks like it will comfortably hold my hand!
I'll admit it took me a couple tries to get the right dimension at the "fingers."  If I made them too pronounced, they turmed out looking like actual fingers instead of cat toes.  A gentle slope produced the best results.  

Step 2:  Cut out the fabric.  I chose a green anti-pill blizzard fleece from Joann's.  I cut out two pieces, then with the right-sides facing (I chose the softer side to be my right-side,) I sewed them together and left an opening at the end where my hand would go in.  At this point, I sewed a little mitten structure from some scrap cloth I laying around to be the glove lining.


Haha, and at this point I wasn't thinking and sewed the lining in without stuffing the glove.  So I tore a hole in the lining, stuffed it until I was satisfied the the shape, and sewed the lining back up.

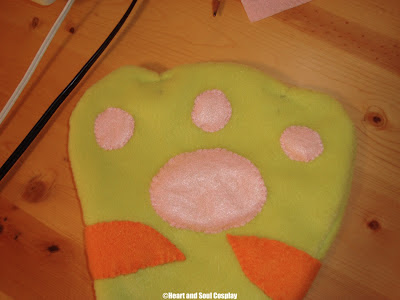
Step 3:  So, as I once again got too far ahead of myself, I realized I should have sewed on all the extras before lining and stuffing the gloves.  So I made patterns for the stripes, claws and pink pads for the glove.  I then reopened the lining, sewed on the accessories, and re-sewed the lining.  

Sizing up the stripe patterns

Stripes are a anti-pill fleece in orange

Sizing my paw pads :3

They are just pink felt!


Picked up a fake-looking leather to make the claws.  I wanted the matte texture, and stronger structure than felt or fleece.


Step 4:  And.....*drumroll*


Ta-daaaaah! A finished pair of cartoony cat gloves! I'll tell you what, they are super comfy and warm, and really fun to play catch with a bouncy ball in.  Since I didn't make an actually glove lining, I really don't have any grip or dexterity.  They are easy to get on and off, however, and I'm also really happy with how they turned out.  

Next blog post in the Gatomon series will be on how I made the tail I will be wearing! Look forward to that and other blog posts, please! 

Feel free to leave feedback,  also! Questions, comments, or concerns? All are welcome!

-Alycia


New Blog Title

If in the past couple days, you tried to access my blog but found yourself unable to, I sincerely apologize! I decided to change the name of my blog from "Everyday Otaku" to "Heart and Soul Cosplay."  While both are painfully accurate ("obsessed" is the best word to describe me when it comes to matters of anime and manga,) not to mention cheesy, I decided that "heart and soul" is the image I want to project.

I sincerely do put my heart and soul into each cosplay project I undertake.  Not only that, but each character I choose to cosplay is usually a character that means a lot to me in some way.  Yes, that means I do have strong feelings towards fictional characters, but I don't think that is too unusual.  And since I put so much effort and love into each of my cosplays, I want that to come across in my blog and within the posts I make.

So for now, please keep in mind that my new URL is "heartandsoulcosplay.blogspot.com" and if any of you were kind enough to keep me in your bookmarks, please update those so you can continue to get the quality content that I post :)

-Alycia

Monday, February 4, 2013

First Post of the New Year!

Hi everyone.  Yep, its been a while.  I could make a bunch of excuses as to why I didn't update, but none of them are really valid, soooo I'm just going to move forward. Well, and maybe make a goal here or there.  Part of moving forward for me is going to be not just waiting for content to come to me (i.e., costume progress, conventions, shopping sprees, etc.,) but actually be pro-active about creating content.  Its hard to get down in writing what I really mean, but my thoughts are now out here in public, so I have a bit more motivation to get my (blogging) act together!

Ok so enough blabbing!

So far, the only anime convention to I can make it to on a yearly basis is Sakura-Con in Seattle.  I'm proud to announce that I have one costume totally finished! Pictures to come.  And the costume collaboration I'm working on with my brother-in-law is coming along great! I'm pretty excited, but nervous because the hard parts are coming next.

So to make up for lack of blogging, have a picture of two of my cute kitties hugging!


Totally cute, right? But I think a fight ensued right after I captured this image.  

Okay everyone, thats it for this boring text post! Blog post about my completed cosplay for Sakura-Con 2013 coming next!

-Alycia

Tuesday, September 4, 2012

Shopping Haul!

As I probably have mentioned before, I love shopping.  It's kind of therapeutic/recreational for me, which is sad considering the town I live (and grew up) in isn't even big enough to warrant a Hot Topic, and that's saying something.  So when I had an opportunity earlier in August to travel to Spokane to visit my BFF and do some shopping in a real mall, of course I took it.

I took that opportunity and ran with it, and ending up spending 9 hours in the Northtown Mall.  9 hours of glorious shopping.  I was pretty thrilled, but ran my friend and mom into the ground. I am so sorry (you know who you are.)  Also, I was in super otaku/fangirl mode at that time okay when am I not , so made two or three trips into the Comic Book Shop.


Fairy Tail's Happy! OMG you have no idea how hard we tried to find one of these in the Exhibitor's Hall at Sakura-Con-- it would've been great for our Fairy Tail group.  They all sold out at the convention, but couldn't resist getting one now.  


This necklace is awesome! Not functional, but awesome all the same.  It's pretty simple, a little bottle covered with lace on a silver chain.  It's worked great with any outfit I've worn it with, and has garnered quite a few compliments.  


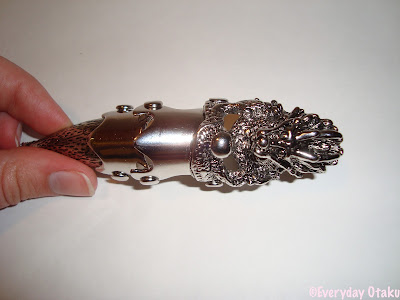
Honestly this is the purchase I've worn the most.  It's a full finger-length armor ring.  I have a couple smaller armor rings, but this is my first large one and I'm totally in love with it. Most of the time it only earns me weird looks or comments, but I enjoy wearing it.  Aside from hampering the use of my hand, its a quick way to spice up an outfit.

Rosario+Vampire playing cards! There is a nice variety of images, and they are fun to play with.

Pocky needs no explanation. It was delicious.

I was super excited to find some Black Cat merchandise.  It's difficulty to find any merch for this awesome series.  Personally, I haven't watched the anime.  How does it compare to the manga?

SPIKES! I'm not usually into flats, but these are pretty awesome (plus on clearance, who could resist that??) I'd also been trying to find some shoes with spikes on them, so I was pretty excited about these.

Had to get my manga fix in. 

I purchased this waist belt for two specific reasons.  One, I needed a black one to complete my set, as I already owned a brown one and white one.  Two, it really evoked images of Final Fantasy VII in my head--mainly from the leather (okay fake leather but it has the same texture) and the multiple straps and silver buckle.  It might be a stretch in some people's minds, but hey I'm the one wearing it and it makes me happy.


A shirt with cool front and back detail.  It fits really nice, also.

A really sharp dress plus it was on sale OMG.  Its longer in the back than in the front, and form-fitted in the bust area, and more relaxed through the hips.  I like the feather belt that came with it, but will probably wear it with my "Final Fantasy VII" belt also.
Haha I was also in a FFVII mindset when I came upon these pants.  It was the semblance to leather that sold me on these skinny jeans.  They aren't pleather; they are a cloth material but there is enough plastic or shiny material that they have a nice sheen and texture to them.  I've worn these with the spiky flats and detailed white tank top and it came together quite nicely.

So what do you think of all my purchases?  Questions, comments, or concerns? Leave me a comment!
Upcoming post:  How I Made my Gatomon Gloves.  Coming soon!