Monday, February 10, 2014

Arts and Crafts: Date Night Jar

Hello again, everyone!

As we shake off the latest cold snap, it's hard to believe that Valentine's Day is just a few days away.  It may be because I am hopelessly in love with my husband, but Valentine's Day remains my favorite commercialized holiday.  Honestly, we don't need a special day to celebrate our love, but all the hearts, pink stuff, stuffed animals, flowers, and all the mushy stuff in the stores just gets to me.  And while I'm pretty mushy and lovey-dovey on a daily basis, having a time of year where I can get away with it in excess is pretty fun.

This year, Brenton and I agreed not to exchange gifts, but I couldn't just let the day pass without commemorating it somehow.  And what could be more ridiculously lovey-dovey than planning dates for the rest of the year?  Thats right, I made a "date night jar"! While we usually don't have any issue planning dates together, sometimes its fun to leave it up to chance.  Plus, the more pink, girly, glittery things I have in my possession, the better.

Need a last minute Valentine's day gift? Something that is heartfelt, sincere, and only requires one stop and some simple steps to put together?  Well, you better read on!

All materials were purchased from Joann's craft store.

What you will need:

  • Pink and red scrapbook paper or card stock of choice (glitter is always good)
  • Mason jar or hooked storage jar
  • Ribbon and lace
  • 2 sheets of alphabet stickers (I reiterate, glitter is good)
  • Fine point Sharpie
  • Scissors
  • Date ideas (the hardest part, honestly)

Step 1:  Make the jar pretty!
             a) Add ribbon and lace around the top of the jar.  While I do like Mason jars or Bell jars, I just think they are a little over-used.  Just as classic and cute is the hooking jar, plus you don't risk losing the lid to the jar.  Tie your selection of ribbon and lace in a bow, or however you so choose.


              b) Add your alphabet stickers to spell out whatever you want on the jar.  With my red, glittery, cursive letters, I spelled out "Date Night Jar," "Love," and "Fun."  Most of the time, you will need two or more sheets of stickers to get enough letters of the proper case in order to spell out what you want.


Step 2: Cut out hearts!
      Using the scrapbook paper, draw out as many hearts as you have date ideas for.  I always start with a stencil, then I traced and cut out 12 red hearts and 12 pink hearts.


Step 3: Write down the date ideas!
     I said this earlier, but this was the hardest part for me.  I asked Brenton to throw in a couple ideas, and we finally came up with twenty four ideas to draw from.  Use a sharpie or whatever you want to write out your date ideas.  Then fold them in half, toss them in the jar, and thats it! After these last couple photos, I will show you the list of some of the date ideas that are in our jar.


Date Ideas:
Most of these our relevant to our interests and local restaurants, parks, etc.  But there are great generic ideas online if you search for "date night jar."  I tried to come up with a good balance of dates out and dates at home.  
  1. Two hours of foreign language study
  2. Program LED heart with Arduino
  3. Sushi at Midori's
  4. Install classic Mario Bro's emulator on Raspberry Pi
  5. Eat Frugal's in car at a park
  6. Action movie with mini pizzas
  7. Walk to Sweet Peak's ice cream
  8. Dinner at Brannigan's Pub
  9. Watch anime and eat chicken wings
  10. Quest together on WoW
  11. Movie at theater and Frozen Yogurt
  12. Cuddling and YouTube fail videos
  13. Dressy dinner at Mambo's
  14. Stroll around Lawrence or Woodland Park
  15. Warhammer skirmish
  16. Buy and play new board game
  17. Ice skating or sledding
  18. Skiing
  19. Comedy movie and Chinese takeout 
  20. Eat dessert first
Obviously, some of these are seasonal, like skiing for winter, and walking outside in summer.  So just throw the heart back in the jar, shake it up, and draw another date!

Until next time, 
-Alycia


Wednesday, January 22, 2014

Morgiana's Headdress, Revisited

Hi there, all!

I hope things are going well for everyone! I've been pretty good myself.  Working full-time is getting to me a bit; I have so many crafting and cosplaying plans, but between working, working out, and keeping up my "adult" chores, I find myself with only an hour or so a night before I have to go to bed and start it all over again.  I'm getting better with time management, but some nights its so easy to just want to melt into the couch and veg out after a stressful work day.  Some days, I really miss college, but I know that being a full time student can be just as taxing as working full time.  So what do I do to cope? Resort to crafting, of course!

I made another addition on my headdress for my Morgiana cosplay.  As you might notice from the pictures below, there is a cute little poof of hair that stands up from the headdress:


Now, my original plan was to pull some of the wig I was wearing up into a tiny ponytail to make the "poof," but then I thought: why not make something that will always be consistent?  Because frankly, pulling a bit of hair into a ponytail is a pain in the butt, and the results won't always look the same, and it could slide out at any time.  The solution? Read on ;)

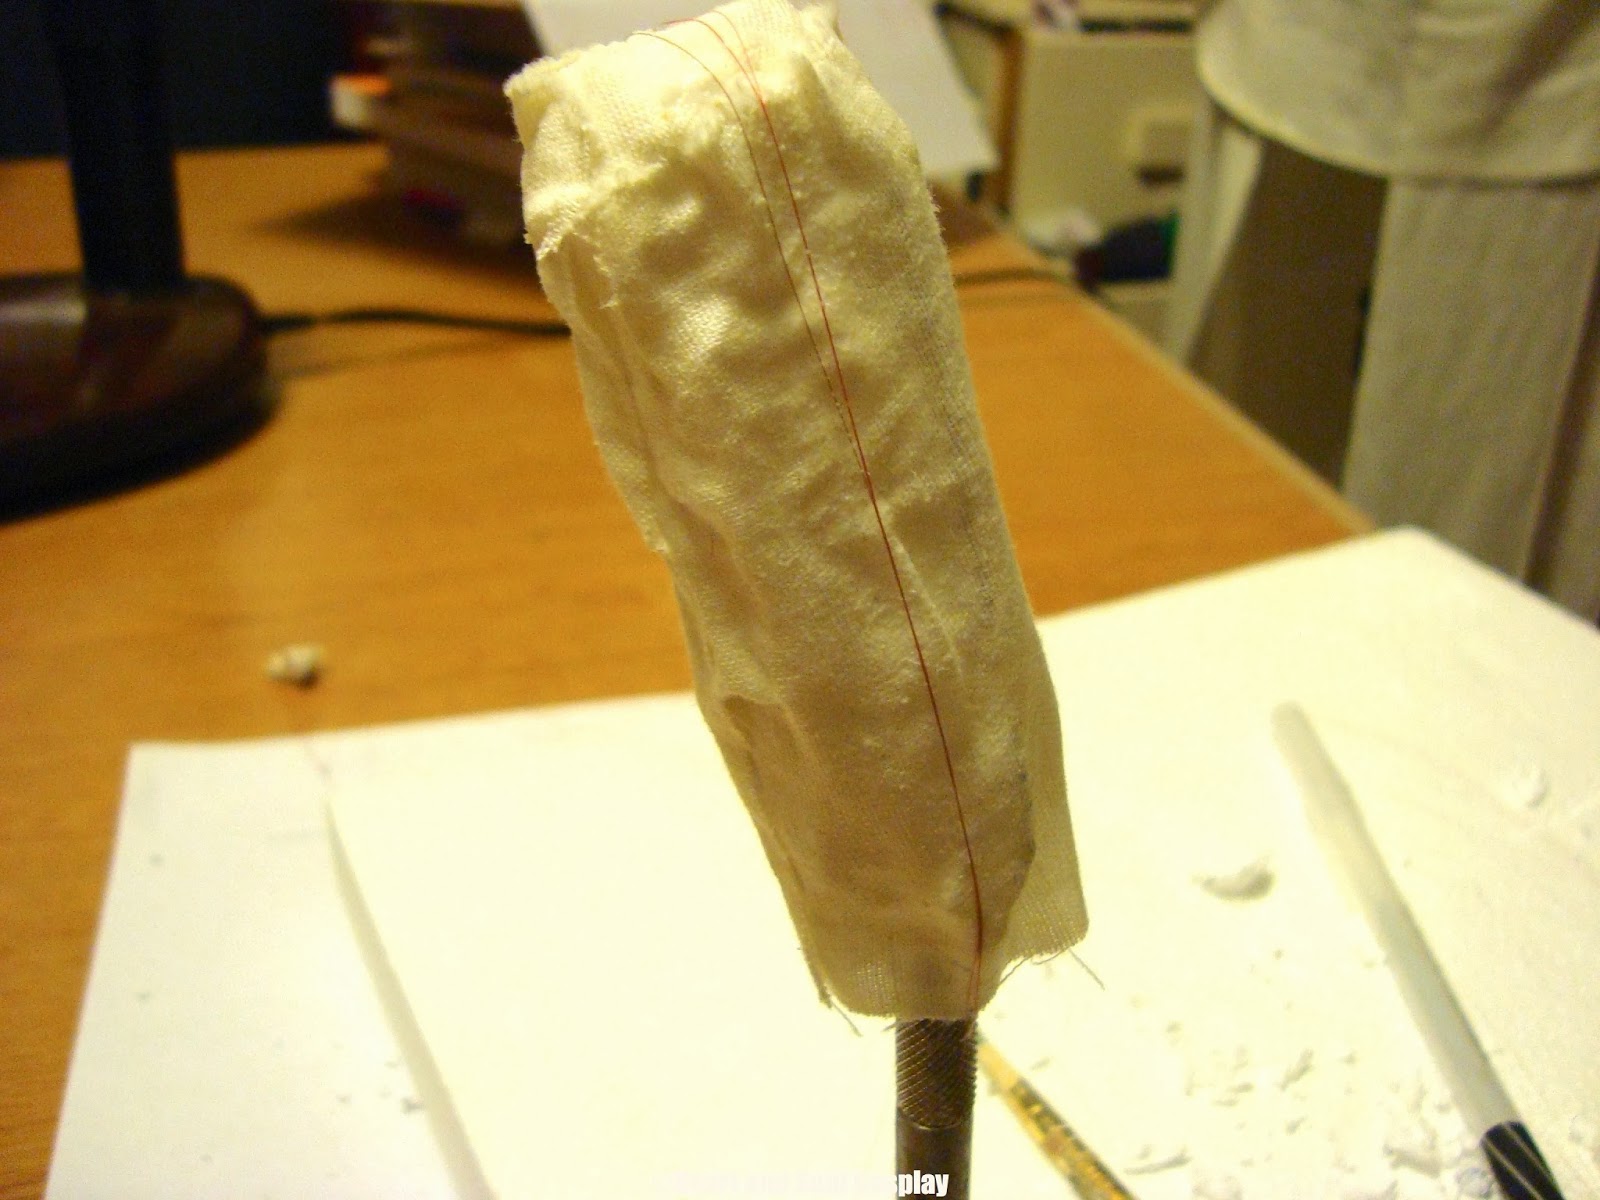
First, I needed something solid to build from.  Thats where some styrofoam comes in.  I made approximate measurements of how wide and tall I wanted the poof to be, leaning towards the smaller side to make sure I had plenty of room for layers of hair.  Once I cut the block out, I trimmed it down into a oblong-ish shape.


Next, I covered it with a layer of scrap fabric so the hair would have a more even surface to stick too.


Then, using wefts I purchased from Arda Wigs, I layered hair over the top of it.  Similar to rolling of a skein of yarn is the best way I could describe it.  I designated one end of the poof the "top", and so to best emulate a natural poof of hair, there are multiple layers, held together with Tacky Glue and Hairspray.

The bottom half of the poof looked really messy because of all the glue, so I made a little ring out of Wonderflex and Rub'n'Buff, glued the hair to the inside, and glued it around the ring I had already made into the headdress.


The sickly yellow lighting in my craft room doesn't do it much justice in photos, but trust me, it came out a lot better than I was expecting it too.  It is super stable, and will be consistent for the future of this costume!

Thanks for reading, everyone! I love getting feedback, so feel free to leave a comment or hit me up on Twitter, @whimsyAly

Until next time,
Alycia

Saturday, January 11, 2014

Arts and Crafts: Repainting an Old Mirror

Why hello there!

How is it going? Sticking to the resolutions you made? Personally, I'm pretty on track with mine.  Although, you shouldn't be too hard on yourself when it comes to making goals or resolutions.  I like breaking big goals down into smaller steps that make it seem more achievable.  I'm also a big believer in rewarding myself for completing a goal; for example, I have some stretches I'm supposed to do for my back health.  If I do those 10 days in a row, I let myself buy a new book or something little for myself.  A fun way to keep track of this is a sticker chart-- as childish as that sounds, its encouraging to see the progress I've made.  Plus I just really like stickers ;)

A little painting project I worked on recently is putting a fresh layer of paint on a mirror I picked up a couple years ago.  It is a super cute mirror, as you'll see in the pictures.  I don't have a place for it yet in my little apartment, but I hope to display it someday.

This is the mirror before I put any paint on it.  Please ignore my attire in my reflection, haha, it's just my tiger kigurumi pajamas.  The paint was in fairly good condition, but around the edges there  were some parts where the paint had chipped off.

 All I did to the body of the mirror was throw a layer of ivory acrylic paint.  Next, some yellow in the middle of the flowers and around the inner edge of the frame, right next to the mirror.


Then, some pink on the flower petals! I do love pink.

Finally, I decided to add some shine with gold leaf at the top of the mirror.  As you might recall (click here if you need a refresher,) I don't get along with gold leaf.  This little episode proved no different, but I persevered.  It turned out okay, but I think I would have rather used a metallic paint.

Here is the final result!  I think it turned out pretty cute.  I kept the colors pretty mild because I wanted it to be able to fit in with most decor.  Plus pink is a color I will never tire of!

Have you done any artsy or crafty things lately? Share with me! I love talking about crafty things, not just cosplay-related things.  

Until next time!
-Alycia

Monday, December 30, 2013

Happy Holidays!

Season's Greetings, everyone!

I know the holidays have mostly passed, but I hope they went well for everyone.  My own were very peaceful and simple, which is all I could ask for.  I'm not sure what I'll be doing for New Years Eve yet, but it would be nice to do something out of the ordinary.  Normally I just stay at home, but if Brenton and I decide to go out it would be very nice.

As far as cosplaying progress goes, this past month wasn't very productive.  The wigs for Justin's and my Magi cosplay came in-- scored a good deal at Arda Wigs' Black Friday sale.  I spent most of the month sewing and knitting Christmas gifts.  I made animal hats for everyone using a Simplicity pattern. I was a little nervous because I am not that experienced in reading patterns, but it was surprisingly simple to follow! In fact, I liked it so much that I had to keep the first one I made for myself, and got more fabric from the store in order to finish everyone else's!

The hats turned out super cute!  I was a little afraid that everyone would think that the hats were too dorky, but everyone really seemed to like them, so I'm happy.  They are super warm and cozy.  The lining is blizzard fleece, and then the fur is polyester fake fur.  I did learn one big lesson from this whole project, however.   Fake fur is my new number one enemy.  It shreds, and shreds, and shreds! Once you sew it up and seal it, it stops falling into little bits.  But for three whole weeks, my entire craft room was covered in little fur bits.  No surface was left un-furred.  Nothing that the vacuum and a few sheets of lint roller couldn't fix, but dang it was annoying.

Since I worked so hard on the hats, I decided to have some fun taking pictures with the hat I kept for myself! I don't know, they might be goofy, but here goes~!
Serious picture is serious.

Gratuitous artsy photo with blurring (haha jk I just moved the camera as it was taking the photo)
Cutesy photo to show off the rest of the hat
Posing with the king of the jungle!
Showing the king who is boss!!


I always try to make New Year's Resolutions.  I have some cosplay-related resolutions this year. One of them is to be a more consistent in blogging.  Another is to stop adding dumb captions to my photos (Ha! Unlikely!) What are some blog posts you would like to see? What are some of your resolutions for 2014?  I like to talk, so you can always hit me up on Twitter or comment below!

Best wishes for 2014!
-Alycia

Saturday, December 7, 2013

Mod Podge Coasters: Fandom Edition!

Happy December everyone!

I can't believe it's December 7th already! The temperature here is clocking in at -4° F, and thats without factoring in wind chill! Needless to say, I have very little motivation to bundle up and venture out in search of holiday gifts for people.  That got me to thinking about home-made fandom related gifts, because more often than not, merchandise of your favorite show and character isn't just pocket change, or easily accessible for that matter.

This step-by-step post today is going to demonstrate a neat little DIY gift I learned how to make at one of the awesome Craft Day sessions I attended (you know who you are!)  Basically, it involves coating layers of Mod Podge and pretty paper on to tiles, and voila, you have a cute, custom coaster.  And did I mention how inexpensive it is to make?  Read on for more details ;)

Supplies:
>4 (or more) 4x4" white ceramic tiles-- available at Home Depot for 16 cents each!
>Mod Podge-- $6.38 on Amazon (the bottle will last a long time!)
>Mod Podge Sealer-- $5 to $6 on Amazon  (will last for many uses!)
>Foam Brush-- around 10 cents at craft store
>Scrapbooking paper-- around 60 cents a sheet, or $1 for fancier paper
>Images relating to your favorite show/video game/manga -- at most office supply stores, you can get color pictures printed for 10 to 25 cents
>Craft foam or cork board -- price varies, but not expensive

Picture time!!
1) This is step hard, and probably the most difficult choice-- Picking what characters or images to put on your tiles! Do you want them all from the same series, or just a mish-mash of your favorite characters of all time?  If you are making these for a friend and know their favorite show/game/manga, you can choose a theme or any sort of image.  If you can draw your own art, fantastic! That is probably the best option here.  But if you are choosing images from online, don't use someone else's fanart; and while using official art may also become a gray area, don't sell the coasters for profit if you aren't using your own art.  These are gifts and are supposed to make people happy! Sorry for the PSA, but sometimes these things just have to be said.  Here are the characters I chose for my own coasters!

 Also, here is the scrapbooking paper I decided on:
 2)  Decide which 4x4" portion of scrapbooking paper that you want to cover the front of your tile.  Cut out your images carefully for placement onto the background.

I made a sturdy guide out of cardboard 
Trace the area to be cut on the back of the paper so you don't leave ink on the front!

 You can be as creative as you want! I wanted a simpler appearance, but feel free to spruce it up with stickers, or multiple images on each coaster.  Do whatever you want!

3) The fun part.  Take your Mod Podge and put a thick layer on just the tile.  Carefully place the 4x4" scrapbook paper onto the tile.  Then another layer of Mod Podge, then the image you want comes next.  Then, you guessed it, another layer of Mod Podge! I prefer to do all 4 tiles at the same time.  I use 5 to 7 layers of Mod Podge, and it dries pretty quick, so just wait until the layer beneath is tacky to add the next one.


 And don't worry, the Mod Podge dries totally clear! Try to keep your brush strokes going in the same direction, because it will dry in the pattern of your brush strokes.  Adding multiple layers of Mod Podge will make it smoother.  Oh! and the Mod Podge is pretty smelly, so try to do this in a well-ventilated area.

 Uh oh! A bubble? I was pretty upset when that happened, but as soon as I let the Mod Podge totally dry overnight, the bubble worked itself out! If you run into the same fate, hopefully it works the same for you.  After the Mod Podge has a chance to dry overnight, seal it with Mod Podge sealer.  The Mod Podge will remain somewhat sticky unless you do this, plus sealing it will help keep any damage from happening to the Mod Podge.

4)  The final step is putting a backing on the tiles.  The back of the tiles is hard and scratchy, therefore likely to ruin any surface it would scoot across.  While cork would certainly look classier, this is a gift to myself, so I used craft foam.
 Tah-dah! Thats it! Some personalized fandom coasters for you or a friend! While inexpensive and easy to make, they are actually pretty thoughtful.  And you can't go wrong with hand-made when gifting to a friend.  Here is a closer look at my finished coasters:

What do you think? What characters would you want to put on your coasters? Or would you choose characters from the same series for your coaster set?  Don't feel like you are limited to four coasters, either! Make 5 coasters, or 8, or 10! Whatever feels right to you.  I hope this helps someone with their gifting ideas this holiday season.

Stay warm, everyone!
-Alycia

Sunday, November 24, 2013

Final result: Morgiana Cosplay!

Hi, all!

So I think saying "I'm done!" with my Morgiana cosplay is a little misleading, but all the sewing is done! All I have left to do is decide on wig and contacts to order, then a little bit of beading for the necklace, then I will really be done!  But none-the-less, most of it is done and I am very proud of myself.  Aside from the top, which was built on top of a bra, this is the first cosplay I've done where I made all the pieces myself instead of repurposing old clothing.  Actually, ignore that last sentence.  That is a lie.  My Erza Scarlet cosplay was done the same way-- I made everything for that except for the bra top that the armor was built over.  But back to this cosplay-- although it might look simple, it was a bit of a challenge for myself because I've never really made anything like this outfit.  And booooy, was it a learning experience in the last stretch.  I'll explain as I go.  For now, here are the photos of the last stages of the sewing!

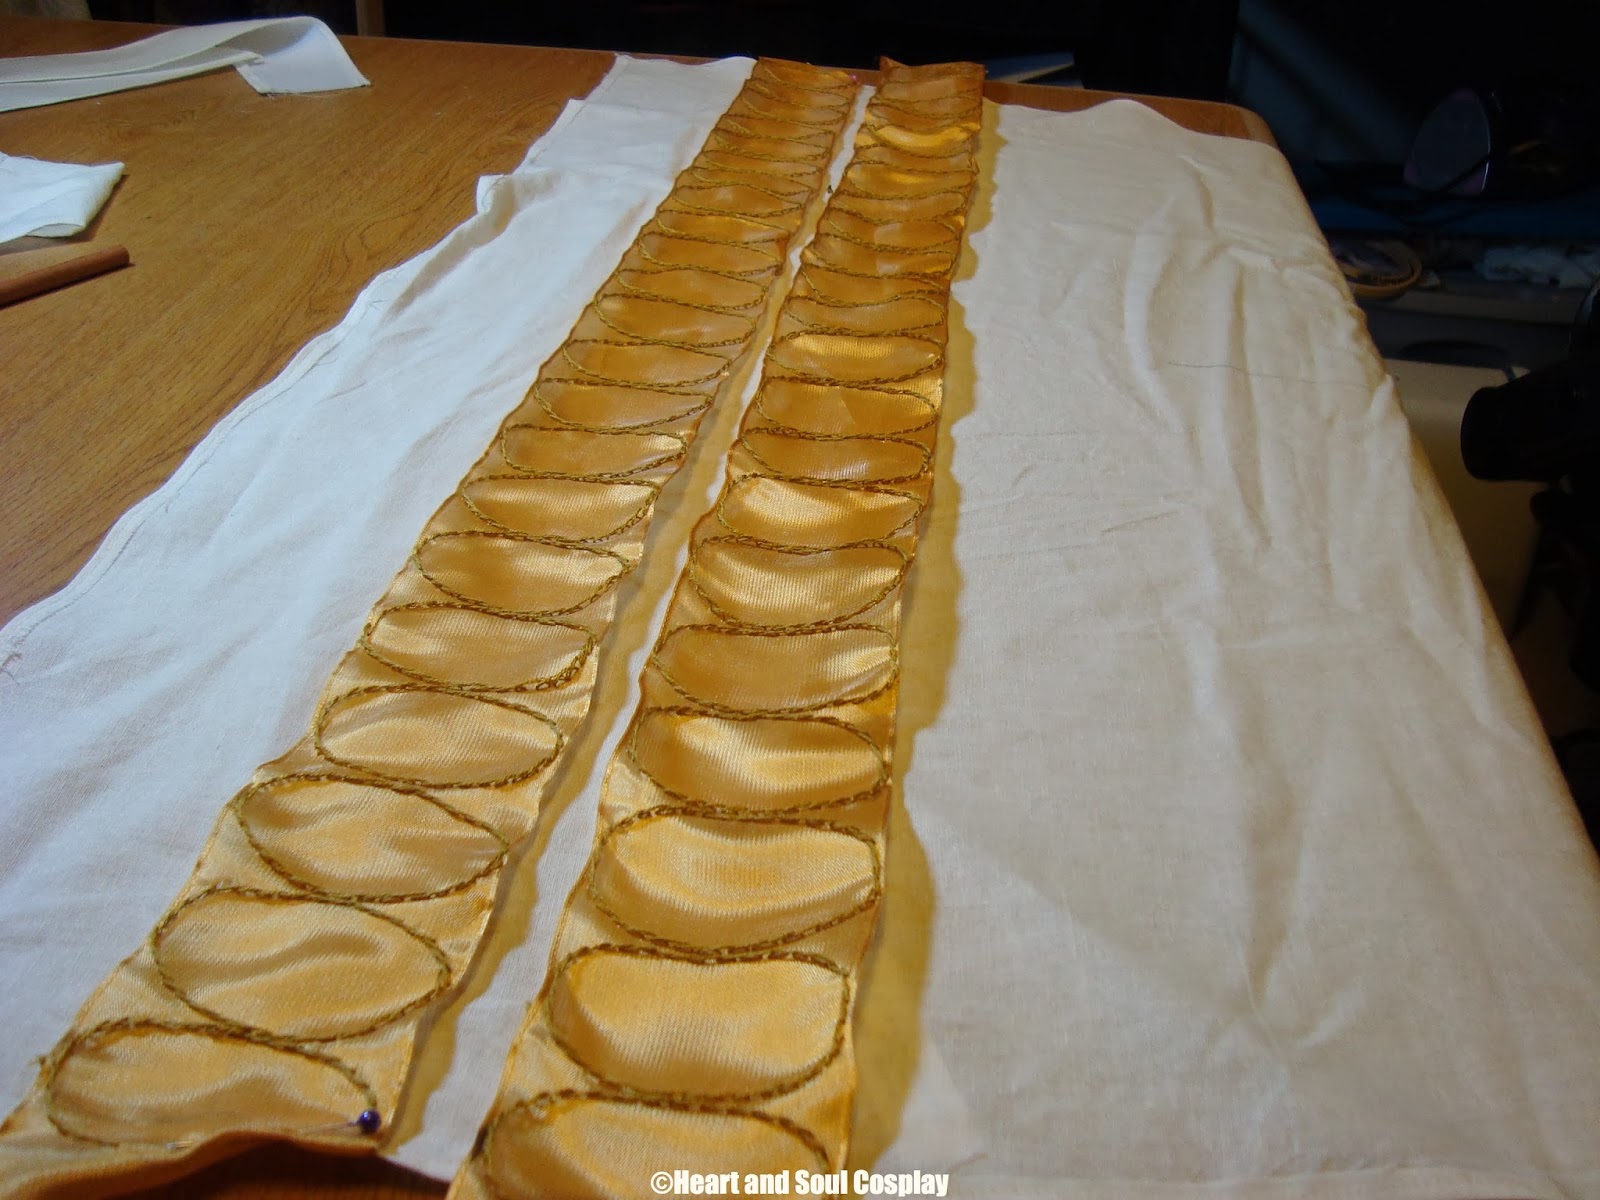
>>Here they are, the notorious embroidered circles!  Lovingly embroidered onto silk wired-ribbon, then painstakingly hand-stitched into place so they would match up on the front and back of the skirt.

See my beautiful, even stitches! Mostly..... 
Front view
Back view
 >>Now, I needed to construct some sort of belt to keep the two skirt pieces attached and secure on my body.  So I made a strip of material and reinforced it with fusible interfacing, then hand-sewed the two skirt pieces to the "belt".  To make an attachment, I used two hook/eye combos, as seen below:

The eye
The hook
The final result 
It all comes together now!
 >> Now, for the overlapping material on the skirt.  This was the part that gave me the most frustration, as I didn't abide by the "measure twice, cut once" rule and ended up doing a section about three times.  I decided to build the different sections of draping, for lack of a better word, into separate sections that could be snapped and unsnapped, just for the ease of getting the cosplay on and off.
 Above is the first front flap I made.  It turned out to be a little too revealing for my tastes, so you'll see later on that I replaced it for a more modest drape in the front.
Snaps are easy to install, easy to use!

An example of the draping.  The back drape is a bit bigger than the front one, and hangs down a little more in the back.
>>Lastly, there is fabric that hangs down on each side, connecting at the top and draping at the bottom.   I sewed it onto the top, and then it will tuck into the bottom and be plenty secure.


Voila! The finished cosplay! Okay, mostly finished.  Once I get the wig and contacts, I have a photo shoot plan in my head that I can't wait to do.  It will be worn in "debut" at the 2014 Sakura-Con, to which I am elated to say I already have tickets purchased for and hotel booked.   Also-- exciting news, Justin is joining me in this cosplay as Masrur, who in the Magi series is one of Sinbad's Eight Generals.  Seriously, if you haven't checked out this series you are missing out! I'll be posting progress of this cosplay, because it will involve making some armor, and will be a bit different than any other armor-related cosplays we have done before.

Any questions or comments? Don't be afraid to leave a comment or send an e-mail or tweet! I enjoy your feedback.

Take care, everyone!
-Alycia
heartandsoulcosplay@gmail.com or @whimsyAly on Twitter


Saturday, November 16, 2013

First November Update: Progress has been slow

Hello everyone!

It's been a couple weeks, hasn't it? I've been working hard, I promise!! I just finished the hand embroidered ovals I talked about in September on my Instagram video.  I really enjoy hand embroidering, I always have, but it's pretty slow work on slick material like the ribbon I used.  The finished trim turned out great, though, and once I finish sewing it onto the skirt and finish a good portion of the skirt I will make a progress post with photos for everyone.

I've also been visiting a lot of local craft fairs and vintage markets.  I went to my first "Vintage Whites Market" here in the valley, and was really impressed and got a lot of crafty-inspiration.  It's actually quite terrible when I go to craft fairs, because instead of seeing something I want and buying it, I tell myself "Oh, I can make that, no problem!" But honestly I never end up making it, unless I'm really, really motivated to do it.

Oh, and you also may have noticed some graphic enhancements to my blog! Instead of coming up with content for a blog post (actually, one of the things I was gonna do for a blog post molded, eep!) I spent time drawing the header for my blog, and making the background.  The header was sketched in "Sketchbook Pro," on my Mac, and although it may not look like much I spent a good few hours on it and am pretty pleased with myself.  And the background was super fun to make.  I think I could have a future in photo editing ;).  The image is comprised of different photos of objects I have in my craft room.  Its 7 images layered on top of each other, with the backgrounds made transparent so that they would sit pretty with each other.  All the photo editing for this was done in Gimp; it's a free, open-source version of Photoshop, and while a little tricky to figure out, it does a great job.

No photos this time around, sorry! But next post I make will definitely have the progress photos from what I'm doing.  Do you like my work on the background and header for my blog? Wanna scold me for not working fast enough to bring you progress updates? Just wanna say hi? Send me a note on Twitter, or jot out an email to heartandsoulcosplay@gmail.com!

Stay cozy!
-Alycia