Sunday, September 29, 2013

Quick Update: Morgiana's headdress

Hi there everyone! I hope you all are doing well.  I've been keeping myself consistently busy with my Morgiana cosplay.  In my last update, I had nearly finished the headdress for my Morgiana cosplay.  All I needed to do was add the fabric that drapes down from the back of the headdress to her mid-back.  Honestly, figuring out where the fabric started was the source of some frustration-- in the manga, the fabric seems clipped into her hair, whereas in the anime it is actually attached to her headdress.  So, I decided to have the fabric attach to the headdress for my cosplay.  Actually, throughout my research into this costume, there are several differences between the anime and manga versions.  When something like this happens, I will incorporate whichever features I like best.  

Here are a couple photos of the headdress:


I was overall pretty happy about how it turned out, but the length of fabric just seemed so.... un-glam compared to the rest of the headdress, so I decided to add a little bit of pizzazz.  Gold seed beads! I sewed them in groups of two along the bottom of the headdress to add just a hint of sparkle.  


I feel like the beads add a nice, subtle bit of glam to the fabric.  I didn't want to go overboard, but the rest of Morgiana's dance outfit has pretty trim along it so I thought the headdress' fabric deserved a little love.  They seem to show up okay, and I hope they will sparkle nice in the sunlight.  

I've been working hard on the rest of this cosplay and have made good progress, so check back next week for another update.  If you need me in the meantime, leave a comment below, hit me up on Twitter, or shoot an email to heartandsoulcosplay@gmail.com!

Until next time, everyone!
-Alycia

Saturday, September 21, 2013

Super exciting thrift store find!

Hello there!

So every once in a while I like to hit up local thrift stores to look for things I can use for cosplaying purposes, such as jewelry that can be incorporated into a costume, or clothing that can be taken apart or altered to what I need.  Plus, sometimes there are cute little knick knacks that I never know I need until I see them.

Recently, I was in the local Salvation Army when I come across something I've always dreamed of finding, but never thought I would be so lucky.  It is a beautiful, vintage appearing, lace shirt.  Here are some photos of my lucky find!


Aahhhh, isn't it beautiful.  You'll cry when I tell you how much I paid for it.  $4.75.  Yep, thats right.  I nearly cried tears of joy also.  Here, have some close up pictures of the details:


At the collar on the front, and in the middle of the shirt there are the cutest little floral and white seed-bead details.  The middle of the shirt has a heart even! And look at the gorgeous lace and gentle, scalloped edges! 


The bottom of the shirt has a ribbon tie, some more lace detail, and a gentle point in the front and back.

Speaking of the back of the shirt, the neckline and collar area seems pretty simple in comparison to the front, but when you look closer at the buttons, they are actually little flowers! I see them as roses, but I suppose thats open to interpretation.  


The sleeves of the shirt should not go unmentioned, either! The scalloped edge of the lace along the sleeves is not sewed down, so when the sleeve is on the arm the lace stands out a bit.  There is also a ribbon drawstring on the end of the sleeve to draw it tighter around the wrists.


I spent a good half-hour on Google trying to figure out a little bit more about this shirt, but none of my searches produced anything.  Granted, I don't know very much about researching vintage clothing (I'm calling this shirt vintage because it appears that way, and don't have any evidence to make me think otherwise, so there!) so my searches were mostly the name I found on the tag.  I even searched for the brand name on eBay and didn't turn up anything.  So if any of you guys feel like looking into this for me, let me know what you find!

I'm thinking of designing an original costume with this shirt, something along the lines of the Elegant Gothic Lolita style, or maybe a steampunk creation? I don't know yet, but whatever I do, I'm gonna be super excited! For now, I have a couple other cosplays I'm working on and planning out, so this shirt is going to be kept safe until the moment is right.

Any questions or comments about this shirt, or anything else cosplay related? Hit me up on Twitter (@whimsyAly) or email heartandsoulcosplay@gmail.com.

Until next time!
-Alycia

Friday, September 13, 2013

CosplayUSA appearance!

Hi everyone!

So about 4 or 5 months ago, the bimonthly publication "Otaku USA," put out a call for photo submissions from its readers for a cosplay edition of their magazine.  Being a loyal reader of 2 years, I took a chance and submitted a couple photos, one of myself individually, and one of Justin and I in our Final Fantasy VII cosplays.  Then, I waited.  I would eagerly check my messages each day to check for confirmation that they got my submissions, and with each passing day I got more nervous.  Did they not like them? Did they even get the message I sent?  Gradually, I forgot about the whole situation.  

Then, one fateful day in mid-July, I suddenly got a response.  They were requesting formal permission to use both of the photos I submitted! Naturally, I was ecstatic and said YES! I spent the rest of the day on cloud nine, and couldn't wait to tell Brenton, Justin, my parents, my friends.... you get the idea.  Now, the wait was on for August 27th, when the print edition would be released.  I was so excited the morning of that I got up early and went to Wal-Mart before work to pick up all the copies they had on the shelves.  Mission success! Here, have some pictures of the magazine and inside.  I will have more to say after that.


See us?! They put Justin and I on the right page with some other great Final Fantasy cosplays, and put me in my Erza Scarlet cosplay on the left bottom side, next to fellow Fairy Tail member Gajeel :D

In case you haven't picked up on it already, I'm pretty dang happy they accepted both of our submissions.  We've made it into some fantastic cosplay videos before, which we've definitely been totally psyched about, but there is just something about being in a print magazine, a nation publication, that makes my heart skip a beat.  To be honest, sometimes I have these nagging moments of self-doubt where I tell myself it was just a call for photos, an open submission.... but then I think, so what? They obviously thought they were good enough to be published, and that alone makes me really happy.  Not just Justin and I, but my whole family and friends supported me in making all of these cosplays, whether it was accompanying me while shopping for materials, helping me spray paint parts, making the huge Buster Swords, or making sure we made it through the convention hall unscathed or not knocking anyone else out.  So I am grateful and honored to have had our photos accepted.

That leads me to say first to my family and friends, thank you for your love and support, and I hope to continue to earn and receive that.  Second, thank you to Justin for being an awesome cosplay partner, spending long hours on our feet holding twenty-plus pounds of prop weapons.  Last but not least, thank you to Otaku USA for the opportunity to be in this great cosplay edition.  Not only are Justin and I in the same publication that has some of our cosplay idols gracing the pages, but we also learned of new cosplayers to learn from and admire!

Justin also has a few thoughts he'd like to get out! Read on~

It's pretty exciting to be able to be recognized as your character, let alone to be recognized for how well your cosplay was made! One thing that always makes a cosplay better is having both the support from friends (and family) who will be there dressed up with you. It is both a surprise and an honor to have been published in Otaku USA magazine, but we would have never have been there if it wasn't for the positive feedback that we get from fellow cosplayers and anime lovers alike!

~~~
And that is what we both have to say about our appearance in this magazine! We hope you enjoyed our thoughts and feelings, and will continue to look forward to our future cosplays and interactions.  We appreciate your support!

Sincerely, 
Alycia and Justin of Heart and Soul Cosplay

Friday, September 6, 2013

Morgiana Cosplay Update: Accessories!

Hi everyone!

I can't believe it's already September.  Time just seems to be flying by lately, so I do my best to make the most of each day!  My summer definitely had it's ups and downs, but let's hope fall is smooth sailing.

This post today contains updates on my ongoing Morgiana (dancing outfit) from Magi cosplay.  I've finished the accessories and this is my write-up on how I achieved that.  This post seemed a little long to me, so I put markers like *~*~*~*~*~* in between each section.  First is the overall accessories, then headband construction, then a blurb on airbrushing silk flowers.  Enjoy!

If you remember my last cosplay update, here, I had an unproductive run-in with metal leaf.  While it looked promising, it just didn't produce the results I was hoping for, so I turned back to my first love in creating a realistic metal appearance-- Rub 'n' Buff.  This time I picked up a couple tubes in "Antique Gold," and I couldn't be more pleased with how my accessories turned out.  Behold!


Aren't they wonderful?? Okay so maybe not everyone sees what I what I do in them, but they are exactly what I pictured in my head.  They look metallic, but aren't super shiny. They were all custom-molded to myself while the Wonderflex was still warm and malleable, so they fit just how I want them too.  The ankle cuffs have some Velcro glued to them so they stay put!

The metallic color was achieved through the following steps:  I applied one layer of Rub 'n' Buff, then buffed it with a clean rag, applied a second layer, buffed it again, then sealed it with acrylic floor wax.  

The gem on the torque was lovingly sculpted and painted by my husband.  We decided on a silver setting to help it stand out a bit against the gold.  Superglue is holding it in place.  Never underestimate the power of superglue.  

*~*~*~*~*~*

The next accessory I'm going to write about is the headdress Morgiana wears in her dancing outfit. It is a thick gold headband that has more gold dangling from each end, layered with pink and blue flowers, and has a gold ring on the left backside of the band that a tuft of hair sticks up through.  Depending on what image you look at, the anime versus the manga, there is also cloth attached to the back that drapes down to the small of her back.


In advance, I made the headband and Rub 'n' Buff'd it gold, sewed strands of pink flowers together, and found some gold earrings that matched the extra gold dangling from her headband.  My next dilemma, however, was how was I going to attach all of that to a piece of plastic with some wax-based paint on it?  Despite how much I love and trust superglue and hotglue, I just didn't think they could handle it by themselves for this project.  I consulted my husband, and he handed me this little tool:

A miniature, hand-powered drill! I don't know if it has a more official term, but I think it's just a small drill-bit shoved into an x-acto handle.  Well, whatever it is, it works.  It drilled through the plastic without cracking it, or demolishing the paint.  


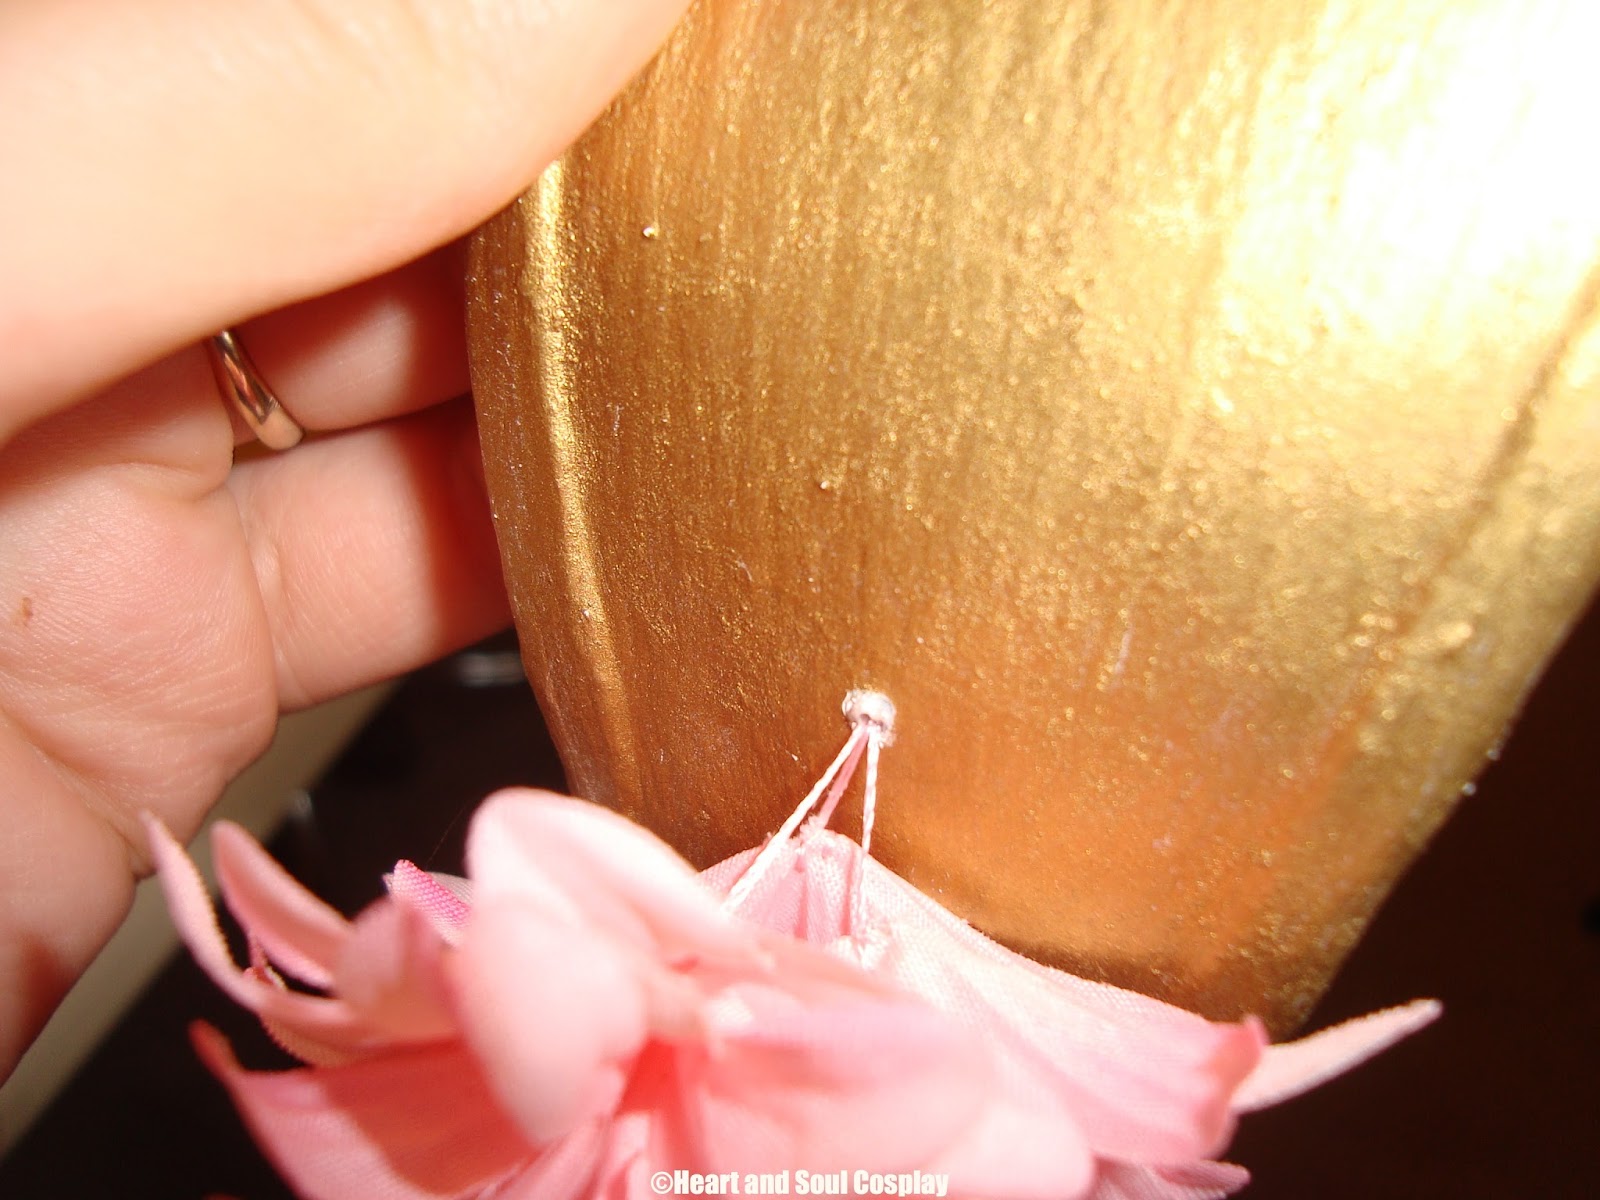
I actually used with existing earring hook and threaded it through the little hole I drilled.  I secured it on the underside with some superglue and felt.  I also threaded the flowers through the upper hole.  On the right side, there only is pink flowers so I made an extra bunch of flowers for the top to hide where the strings go in.  All of the flower thread was secured on the underside with superglue.


This side doesn't have the extra bunch of pink flowers at the top because it will have the large blue flower covering it.
*~*~*~*~*~*

For the blue flower on her headdress, I searched every store in town to find something even remotely similar to what is depicted.  I interpreted it as a blue lily, so I blue lily is what I scouted for.  As it turns out, you can find plenty of blue silk flowers, but I had no luck with a lily.  So I decided to take matters into my own hands.  I found the perfect bouquet of white lilies at Wal-Mart, they were evenly sized and large enough for what I wanted.  My husband also happens to own an airbrush, so herein begins my experience with airbrushing!

Firstly, I decided which flower I wanted to use, then separated it into its individual pieces.


Secondly, I gathered the materials I would need.  I would recommend using an air mask and gloves as a start for personal protective equipment.

The magic machine!

The magic tool! Sorry for the glare.

Thirdly, I had a bottle of water nearby because it's important no to let the well run dry.  Under my husbands instruction, we played with colors of his acrylic paint and watered it down until it was approximately the consistence of thin milk.  I set up a backdrop out of a folded piece of poster paper, but a cardboard box would've made a nice painting booth also.  After a few minutes of practice, I felt ready to paint my flower!  I painted both the top and underside of each set of petals, and the stamen parts. I would also like to note its nearly impossible to make two batches of paint the same color you want, so always error on the side of too much paint than not enough.  But, I'm really happy with how it turned out! 


Looks pretty spiffy, I think!  To attach it, I used a combination of strong-arm sewing techniques (meaning I really had to wrestle the needle and thread through the body of the flower) and superglue! Here is the end result!


Honestly, it looks a lot better without my hand in the middle of it haha.  I've also done more work to it that I will add photos of in a future post. Now that I'm done with the accessories for this cosplay, I can start the sewing! I'm both excited and nervous for this part, but I'll take photos to share along the way!

That's it for now, folks! Drop me a line in the comments below, via email through heartandsoulcosplay@gmail.com, or hit me up on Twitter if you have questions or topics you want to see me write about!

-Alycia

Tuesday, August 6, 2013

Book Review: The Wizard in Wonderland

Hi everyone! Thought I'd post a little something that didn't have to do with cosplay and see how it went over.  I recently had the pleasure of reading “The Wizard in Wonderland,” written by local Kalispell author Ron Glick. It's a brand-new adventure for the protagonists of two timeless classics, The Wonderful Wizard of Oz and Alice in Wonderland. In short, the Wizard disappears and Dorothy sets off to find him, only to meet Alice. Alice is accidentally summoned back to Oz in Dorothy's place, and Dorothy is led to Wonderland in further search of the Wizard. As the two travel deeper in the other's world, it becomes evident that outside, potentially sinister forces are at play.

I'll admit, I first approached this book with caution because I had very limited knowledge of these worlds. I've watched “The Wizard of Oz” movie a couple times, and performed a couple songs from “Wicked” in high school orchestra. As far as “Alice in Wonderland” goes, I've seen the Disney versions, as well as read a couple manga re-interpretations. So I was a little nervous coming in that I would be totally lost. Much to my relief, Glick does an excellent job of providing essential history and backstory. What was provided was clear and succinct; I was informed enough to be able to follow the current story and not slowed down by an overly-lengthy recap.

Next, the characterization of the two protagonists was excellent in my opinion. I remember Dorothy as always acting rather shocked when she is surprised or caught off-guard, whereas I see Alice as always taking things in stride and going with the flow (which makes sense because she is convinced she is dreaming half the time.) Glick stays true with these characterizations, and it made the character interactions interesting and lively as well. How Dorothy and Alice interacted and reacted in their new situations felt really natural to me, and did not seem forced. One character portrayal that I felt confused by was that of Glinda the Good. I remember her as being a sweet and patient woman, but in this case she seems more stoic, coming off as defensive and troubled at times. I'll once again admit I've only seen the musical adaptation of the “Wizard of Oz,” so I don't know if my image of Glinda is skewed or not, but I was slightly perturbed by her personality in this appearance.

The pacing of the plot is another point I would like to touch on. The viewpoint alternates between Dorothy and Alice, which keeps it at a refreshing pace yet I don't feel rushed at any point. While some people find this flipping back and forth to break up the plot, that was not the case in this instance. The plot itself moved quickly enough to keep me engaged, but not so fast that I felt uneasy or frantic. The book ended on a bit of a cliffhanger, which doesn't bother me personally as long as there is a followup novel!

Overall, this was a delightful read, full of the whimsy found in the two classics, but with a fresh twist. I would encourage anyone to check it out, whether you're a fan of “The Wonderful Wizard of Oz,” “Alice in Wonderland,” or have limited experience with either but still want a good read. Find it on Amazon: http://www.amazon.com/dp/B00AVISKUI/?tag=bookshowme-20

Until next time, friends!

-Alycia

Sunday, July 14, 2013

Cosplay Update + Adventures in Metal Leafing

Hi everyone!

It's been a while since my last update! Where does the time go? Well, once the weather up here in the northern treasure state got nice, it's been pretty hard to keep me indoors.  I think my inadvertent sunburns are more than evidence enough of that.  My husband and I also rearranged our little apartment so that I have my very own craft room now! I'm very lucky ^.^, and now I have lots more space to spread out and work on cosplay projects!

And that is what I have to report to you today, is some progress I've made on my latest cosplay.  I will be cosplaying Morgiana from the manga/anime "Magi."  It's a series loosely based on the "Arabian Nights" stories-- mainly they use the same character names, and its roughly the same time period.  It's quite enjoyable to watch, and I would definitely recommend it.  Morgiana is my favorite character from the series.  She has excellent character development and she is a strong character with a well-defined personality.  Specifically, I will be cosplaying the outfit she wears in episode 18 of the anime.  I've included an image below for your viewing convenience, but to see the whole series you can visit http://www.crunchyroll.com/magi.

This outfit also makes an appearance in chapter 81 of the manga.  Morgiana's usual outfit is much more conservative.  This particular one is worn for a festival, but I chose this one because its going to present much more of a design challenge for myself.  Sure, it doesn't look like much sewing, but I'm going to have to learn new sewing techniques.  This will also be the first time I've created a cosplay from the ground up, rather than utilizing clothes or accessories that already exist. And who doesn't love a challenge?

The first thing I've gotten started on is the accessories.  From the image above you can see it includes two ankle cuffs, one wrist cuff, a necklace with a chain that attaches to the top, and a headband.  All presumably made out of gold.  As I certainly don't have the financial means to buy and process gold, and hours of scouring the internet were fruitless, I decided to build everything out of good ol' Wonderflex.  

Continue down the post for photos and explanations of my progress thus far! ;)
This is the pattern for the body of the headband
Ta-dah! I used two layers of Wonderflex, plus a thin third outline of Wonderflex to give it definition.
The little ring is where a little tuft of hair comes through (see above photo^^)
Made patterns and traced everything else out onto Wonderflex.
Everything finished! There are approximately 8 to 10 layers of Gesso on here.  Gesso primes the Wonderflex for whatever painting material you are going to use.
If you are wondering how I formed the cuffs, what I did was warm up the Wonderflex  with a heat gun, waited for it to cool just slightly, then curved it around whatever I needed it shaped to, i.e. my wrist, ankle, or head.  It's best to protect your skin with a layer or two of plastic wrap if you want to form Wonderflex directly to your body.  

*To get double (or more) layers of Wonderflex, all you have to do is heat all the piece up with the heat gun and stick them all together.  For extra stability (I did this in the ankle cuffs), simply sandwich a piece of craft foam in between the Wonderflex layers.  
Left wrist cuff.  If you caught it in the photo above, I accidentally made a wrist cuff for each wrist, although I only need the left wrist.  But too many wrist cuffs are better than not enough, right?
Perfect fit!

So, onto my adventures in metal leafing.  Metal leafing is a method in which you apply an adhesive, the metal leaf (a foil like substance that is metallic,) and then a sealer and you can turn pretty much any surface into something shiny and pretty.  After watching a few videos and doing some research on the use of metal leaf, I thought it would be pretty nifty to use it on my accessories to make them shiny gold.


The test run went pretty well.  It seemed to go on smooth and was pretty durable, unless I tried really hard to scrape it off.  
"Look at me, I'm so pretttty and shiiiiny."
When I went to apply it over a large surface area though, I had a very difficult time maintaining a smooth, uniform texture.  I got about halfway through my headband when I decided that I'm going to order some gold Rub 'n' Buff and finish my accessories with that.  It doesn't look as bad in the photos as it does in real life, but the scratchy texture is very noticeable in real life, plus I feel like this is almost too shiny for what I am aiming for.  I feel like the metal leaf would work really well for other applications, like refinishing a frame or gilding small areas, but it's just not what I wanted for my cuffs.
"I lied, I'm not so smooth and shiny after all!"

"I'm also very messy to clean up and you are going to find gold flakes all over your craft room for MONTHS!"
Thus ended my adventure with metal leafing.  I've already ordered gold Rub 'n' Buff from Amazon and should have it within the week!
I'm very excited to finish this cosplay.  I think it's going to be really fun to wear, and I'm looking forward to the sewing challenge. It is also pretty good fitness motivation :)

Any questions or comments? As always, let me know!
Until next time,
-Alycia


Monday, June 3, 2013

No-Sew Mini Top Hat Tutorial!

Hello everyone!

Today I'm bringing you a step-by-step tutorial (with photos!) on how to make a miniature top hat, without sewing.  This tutorial is meant to be quick and easy, so obviously the end result is not as.... "pretty" as it would be if I had spent hours meticulously sizing up and hand-sewing each piece.  This is meant to be simple and fun, so lets enjoy it!

Materials:

  • Paper (for patterning)
  • Craft foam (for giving structure to the hat)
  • Felt (optional, reinforces structure of hat)
  • Hot glue gun
  • Material of choice (approximately a 2x2 foot piece, just to be safe)
  • Embellishments of choice
  • Hair clips or attachments of choice


Step 1
     Decide how big you want your top hat to be, or just wing it! You will need three pattern pieces:  a rectangle that will be the "body" of the top hat, a circle that will cover the top of your hat, and a bigger circle for the brim of your hat.

Trim the top part down so it sits pretty on the body

Step 2
     Cut your pattern pieces out of craft foam. Use masking tape to tape your rectangle into a circular shape.  For the brim of the hat, cut a hole into the middle of it approximately the size of the body of the hat, erring on the side of smaller.  For extra stability on the brim, I cut out a second brim and hot glued the two pieces together.  For extra stability in the body, I glued felt into it and re-taped it shut,


Step 3
     Choose your fabric and start gluing!  For the body, I started with a piece about an inch wider on each side, and folded it over on the inside.

This is using the original pattern piece so I didn't have to cut the hat apart again!

I pinned it in place for the first couple inches, then slowly and carefully hot glued all the way around on the inside.  When I reached the end, I folded the fabric over and glued it down.


This is the top circle.  I glued it using what I dubbed the "glue, fold, and tuck method."  Almost ran out of fabric at the end, but had just enough to cover it.
I don't know why I had that silver circle lol

You'd never guess the bottom looks like a mess, right?
For the brim, I just used the same method as above.  Chances are, one side will end up prettier than the other, so at your discretion, use the pretty side for the side people will see (AKA the side that isn't against your head.)


Step 4
     Hot glue that baby together!


Step 5
     Embellish! I made a band using a pretty silky material, but just plain ribbon would work fine, or whatever you want.  And yes, I sewed the band together, and sewed it to the hat because silk material and hot glue do not play well together.  Learned that the hard way.  For the extra stuff, I had some feathers laying around which I hot-glued on.  I also dismantled some clearance-rack jewelry and hot-glued over the feathers.  The lace around the bottom of the brim is from a dollar roll at Jo-Ann's.


Step 5
     Attach attachments!  I used some hair clips that I purchased at Jo-Ann's, but use whatever you want, be it a ribbon or stretchy cord or whatever.  If you do use a clip of some sort, I would recommend securing it by gluing a piece of felt over it.


Step 6
     Wear proudly! Enjoy!
oh lala!

As usual, feel free to let me know if you enjoyed this.  If you want to see something like this in the future, or have any suggestions for tutorials, just let me know! And you have any questions for me about this tutorial or my cosplays in general, you can ask me here or shoot me an e-mail at heartandsoulcosplay@gmail.com

Sincerely, 
Alycia