Monday, October 28, 2013

Nail Art! Rin Matsuoka from Free! ending song

Happy Fall, everyone!
     
      I've finally come to terms with the fact that Autumn has fully set in.  It's a little hard to deny that fact when all the leaves are gone from the tree right out in front of my kitchen window.  But hey, Halloween is only a few days away, which means that I can dress up however I want.  Not that I don't do that anyways, haha.

     An anime I absolutely fell for this summer was Free!, also known as the swimming anime.  I won't go into too many details (watch it for yourself on Crunchyroll.com!) but personally, I feel it was really well done.  And while its in a modern day setting, the ending song puts the main characters in an "Arabian Nights" sort of setting.  Something I noticed right away was that one of the characters (Rin Matsuoka) had a neat nail design on.  I went all summer without thinking too hard about it, but then the anime ended for the season a month or so ago.  In my anime withdrawal-wracked brain, I decided I needed to something to commemorate the anime, hence this blog post about my first attempt at nail art!

Firstly, here is the picture I used for reference:


His nails look so nice and evenly done, yes? Do you think I can accomplish the same feat? Let's find out!

I started with two base layers of a white nail polish. One layer is shown in the photo.  Polish is Andrea's Choice in "Reverso"


Because I'm all about the glam, I added a couple layers of a gold sparkle polish.  Polish is Hard Candy's "Crush on Gold"
very glam.  much sparkle.
 Next, after the first few layers of polish dried, I cut a little triangle shape out of some medical tape.   This will serve as a stencil for the black polish to go around.

For tracing around the edge of the stencil, I used a nail-art brush that has a very thin brush for making fine details.  The brand is "Art Club."  


I carefully traced around the edge of the stencil, rather than slopping paint all over it, because the tape I used was a little porous and I wanted to keep sharp, clean lines rather than blotchy shapes.  I filled in the rest of the nail with a non-art brush, using Sally Hansen's "Black Out" polish.

Repeated on all my nails, then finished with a clear coat to preserve my hard work!

 Final thoughts-- I love it! I've gotten more compliments than I anticipated, from coworkers, friends, and even strangers!  I will admit, my right hand didn't turn out quite as even or pretty because I had to use my non-dominant hand to paint with.  But from a distance its fine. Regardless of all that, this design works well because it creates the illusion of longer, graceful nails when in reality my fingernails are kept really short for work.  It's edgy without being overwhelming, and is kind of Halloween-themed also (I've gotten several comments that it looks like cat claws.)  I especially liked adding the gold sparkle, but I think a creamy gold color would be pretty also.

Thank you so much for reading! I love hearing feedback, so don't be afraid to leave questions or comments.

Stay warm, everyone!
-Alycia
heartandsoulcosplay@gmail.com, @whimsyAly on Twitter

Sunday, October 20, 2013

Photo Shoot: Erza Scarlet Heaven's Wheel

Hello friends!

TL;DR-- here are some photos of me cosplaying as Erza Scarlet's Heaven's Wheel cosplay from Fairy Tail.  The cosplay was completed in spring of 2012 after a whole winter's worth of work.  Photos taken by my husband at the base of the trail to Strawberry Lake in the Rocky Mountains.  Skip the big chunk of text below to get to the photos ;)

The long version:  In summer of 2012, I decided I wanted to do a photo shoot of my Heaven's Wheel cosplay.  I had spent hours, blood, sweat, and tears on this cosplay.  It was my first "armored" cosplay, and I learned so much from doing it and was so proud of it that I wanted a photo shoot to get some good photos to do it justice.  Well, let's just say my photoshoot didn't quite turn out the way I anticipated, but I learned a lot from that experience as well.
          Lesson 1:  Always bring a mirror, especially if you are going to shoot the photos in the middle of the woods! This should've been a no-brainer, but I didn't own a a hand held mirror and assumed I could rely on the rearview and side mirrors of the car.  Well, that didn't quite cut it.  My headpiece ended up sitting much lower than intended.  Being the perfectionist that I am, I wanted to scrap all the photos we took over two hours and start over, but that leads us to lesson 2....
          Lesson 2:  Hot glue, craft foam, and wax-based paint do not hold up well in 85ºF weather.  My armor ended up splitting apart at the seams, and I'm pretty sure there was more silver paint on my body than was left on the armor by the end of the photo shoot.  So redoing the photo shoot is not an option unless/until I re-make the cosplay.  I'll admit, it was pretty discouraging to have my cosplay come apart before my very eyes, and I may or may not have cried a little.  However, I have since discovered thermoplastic materials such as Wonderflex and Worbla, and any armor cosplays I do in the future will be built from those materials.

I have to say, it is thanks to the encouragement of my husband that I have decided to post these photos.  For the first six months, I was adamantly against even looking at them because I felt so silly that I couldn't even get my headband in the right place without a mirror, but eventually my husband got it through my head that the photos still turned out nice.  So, here they are and I hope you enjoy :)


Don't pay any mind to my melting wing haha


Gratuitous out-of-focus artsy shot


Thank you for taking the time to look at my photos.  I think my husband did an awesome job taking the photos, and the forest was beautiful despite all the horse-flies pestering us.  The whole experience with this cosplay taught me a lot, and I'm looking forward to making more armored cosplays.  I have another one of Erza's that is really on my mind, in fact :)

As always, feel free to leave a comment or hit me up on email or Twitter!

Sincerely, 
Alycia
heartandsoulcosplay@gmail.com
@whimsyAly

Tuesday, October 15, 2013

Makeup Tutorial: Moka Akashiya

Hi everyone! I recently created a video makeup tutorial demonstrating the makeup I used for my cosplay of Moka Akashiya, from Rosario + Vampire.  It was one of the first cosplays I ever did, and while there are definitely things I would change now that I have learned more, I think it still turned out very well.

This cosplay was also done before I knew colored contacts were easily available for ordering online, so the video goes on to explain my interpretation of the eye makeup, and how I chose it to match Moka's coloring with her eyes and hair.  Watch the video below! Under the video, I'll list the products I used, and explain how I created the video :)


Products used (in order):
Revlon Photo-Ready primer
SheerCover duo concealer
Clinique perfectly real makeup
Clinique Touch Base eye primer
Coastal Scents 88 original palette
Rimmel Exaggerate Waterproof eyeliner in Emerald Shimmer
N.Y.C. white eyeliner
Clinique eyeshadow in Frosted Blossom
Maybelline Falsies Mascara
Clinique Quick-Blush in Berry on Time
Clinique vitamin C lip smoothie in Pink me Up
Rimmel Stay Matte pressed powder


Video creating details:
All content was filmed and edited by yours truly :) I used iMovie for all the editing purposes.  Music is opensourced from http://opsound.org/artist/theorchestralmovementof1932/ .  The song is "Home" and you should totally check some more of their music out.

If you have managed to read this far, thank you so much! This is the first time I've ever filmed a tutorial and have talked straight for like 17 minutes straight, and to be honest I'm super nervous about putting myself out on the Internets in this format.  It was a good experience, however, and I had a lot of fun editing and putting the whole video together.  Depending on the feedback I get, there may or may not be more of these in the future, so let me know!

Sincerely,
Alycia

Friday, October 4, 2013

Cosplay Update: Morgiana's Top.

Welcome back, everyone!

What I will show you this week is how I made the top for my Morgiana, from Magi, cosplay, specifically her dancing outfit.  It looks a lot like a tube top, except the fabric appears to be gathered and twisted, and depending on what image you look at, there is a gold circle in the middle of the top.  There are also drape-y pieces of fabric that hang from her top to her bottom, but I've decided to make those detachable and will add those in later.

I started with a nude strapless bra.  I like having the structure and security of a bra that fits snugly, and it worked great as a form to fit my fabric to.  To get the dimensions of the fabric I needed right, I measured around myself as I was wearing the bra, and then then measured the height of the bra.  The piece of fabric I needed would be rectangular, approximately 7 inches tall by 34 inches wide.  I actually made the rectangle a bit bigger than this so I would have extra material to drape and shape the top with.
Here come the pictures~!  I used my dress form, and pinned the fabric into place while the bra was on the form.


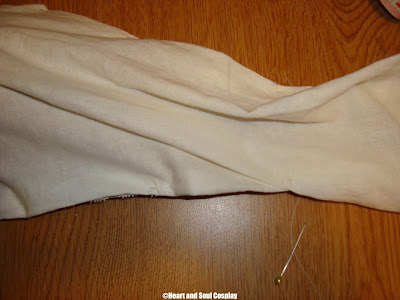
I pinned it while on the dress form because it will then keep that proper shape when I sew it into place off of the dress form.  So when I took it off the dress form, you can see below it became all baggy and out of shape appearing, but just for a trial I tried it on myself, pins and all, and it fit exactly how I needed it to.


For the sewing, it was fairly easy along the cups.  I hand-sewed it all, and not in a continuous line.  I chose several points, such as the top and bottom of each up, and along where the elastic starts, and just sewed back and forth over a tiny stretch.  Sewing along the elastic proved tricky, because I needed to be able to sew while stretched out so the fabric stayed in place.  I asked for Brenton's help here.  It went smoothly in this case, except he did get a little nervous when the needle got a little close to his leg!  I used the same tactic here as I did over the cups, just hand sewing at different points.

If you look closely here you can see a couple of my stitches,
The after photo, all sewed into place.
One last time I strapped it back onto my dress form just to make sure it looked good from all angles.   I'm really happy with how it turned out.  The back is a little messy, but it will be covered by her headdress and/or hair, so I'm not worrying too much about it.  


The last little gem is the gold circle on the top.  It actually serves as an attachment point for a chain that dangles from her necklace.  I found an awesome pin at the thrift store without even really looking-- it was just one of those things that jumped out at me and I knew it would be exactly what I wanted for this cosplay.

Thats it for this week.  If you managed to read this far, thank you so much! I'm still making steady process on this cosplay, slow but steady due to working, working out, and spending time with friends and family.  It's coming together really well and I'm so happy to share my progress with you. I hope you are as excited as I am to see the final result!

Sincerely,
-Alycia