So what I will be describing today is the process I went through to create an attachable tail for my Gatomon gijinka.
The very first step, as with most projects, was research. I spent a good couple hours on the good ol' Internet, looking at different methods people used to create and attach tails, but nothing was really speaking to me as far as what I wanted my tail to do. Some attachments seemed very flimsy, while others were sturdy, but just looked plain uncomfortable. And not to generalize things, but a lot of times when I would search "cosplay tails," the results were for total fursuits, which was also not my goal. So ultimately, I consulted my husband and we came up an attachment that is secure, yet somewhat subtle.
Materials:
-Copper wire of a medium gauge from electrical section of Home Depot (they have it on big spools and they can cut it by the foot for whatever length you need. AWESOME! and not super spendy, either!)
-White felt (for wrapping exposed end of wire)
-Fleece (this is for the body of the tail of course, and I used two colors to achieve my desired tail)
-Stuffing
Step 1: Creating the Tail Skeleton
This is a step I had my husband help me with because I am not strong enough to bend the wire on my own. First, we measured how long the tail was to be (also easier with a second person!) We folded the wire so that it was two-ply throughout the length of the tail, starting in the middle so the "closed" end would be the end of the tail and the "open" ends would be shaped into the attachment.
For the attachment, the wire was shaped into a vague "W" shape, with a bend in-between the two arms of the W and then the middle is a bit recessed.
I was a bad blogger and didn't take a photo of the skeleton before I put finished it, but here are some photos of the attachment so you can get a better idea:
So the "outsides" of the "W" go inside my pants, while the uncovered copper middle of the "W" stays on the outside of my pants. I added the felt for extra grip, and so I didn't have copper touching my skin for an extended period of time and causing a rash.
Step 2: The Body of the Tail.
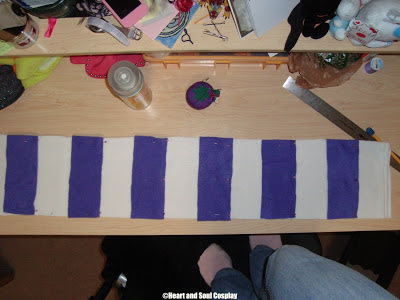
First, I determined how big around I wanted the tail to be, and cut the fabric width accordingly, allowing a bit extra for when I sewed it together. Then, I determined how big I wanted the spaces between stripes to be. Just for clarification, the white portion is all one piece, then the purple stripes are hand-sewed into place.

I then sewed it into a tube. For the end of the tail, with the "three-pronged tuft" for lack of a better description, I patterned out what I wanted it to look like, then cut out the fabric and sewed it together, leaving the part to attach to the end of the tail open. I added stuffing to the tuft at this point, then made jagged edges, and hand sewed it on, like shown below:
Overall, I'm happy with how the tuft turned out. Looking straight on, it seems a little wonky, and looks sort of like a hand. But from most angles, it looks like an anime-style tail tuft.
Step 3: Finishing the Tail.
After the tube was sewn and the tuft attached, I then inserted the copper skeleton. Then, using a wooden dowel with a paper towel wad taped to the end, I stuffed the length of the tail. This was an arduous process, because it took a lot of effort to not overstuff the tail while maintaining an even amount of stuffing throughout the length of the tail. Once I was satisfied, I then sewed the felt on the the attachment and a little bit down the length of the tail, and then sewed the length of the tail shut, as can be seen in the first images.
I've tested the tail on my outfits, and I'm pretty impressed with how well it turned out. The attachment is secure, which I tested by running, bouncing, and skipping around. The attachment also sits nice where my shirt meets my pants. The tail, when straight, barely brushes the floor, but I curved it a bit for more personality. It sways back and forth when I walk, which is cute, I guess? But the important thing is is that it stays in place!
A photo of me wearing it will come after I wear the entire costume at Sakura-Con 2013! So keep coming back to my blog, yes?
I hope this was a helpful blog post! Again, I welcome any questions, comments, or concerns.
Until next time!
-Alycia


No comments:
Post a Comment